Network Installation
VERY IMPORTANT!
Wireless networks typically will NOT transfer Church Windows information between computers consistently enough for the Church Windows software to function.
Any interruptions or signal degradation will cause data loss.
We can only support hardwired networks as a rule since Church Windows requires a constant, uninterrupted, active, and open connection to the databases on the Server.
If you have purchased the network version of
Church Windows and will be installing the program on two or more networked computers, either peer-to-peer or client-server:
- Select a computer to be the Server or host computer for Church Windows. On this computer, follow the Church Windows Installation instructions and choose Server for the type of installation.
- Once
Church Windows is installed on the Server, call the
Church Windows technical staff at
800.533.5227 to enable
Church Windows’ network capability.
Note:
There is no need to do this if you will be Restoring a Backup that already has been enabled for networking from another Server. - Next, have your network technician or some other knowledgeable person share the CW folder on the Server. Make sure that access to that shared folder is clicked as "Full Control" or "Read/Write" with FULL ACCESS for every user and group available. Write down the name of the Server computer so you can find it from the Workstation.
- Then, on each Workstation:
- For Windows 8 or earlier — open up the Start menu, right click on "My Computer" or "Computer" or "My PC", then left click Map Network Drive.
- For Windows 10 — open up your File Explorer from the taskbar or click the Start menu button, select This PC, then on the Computer tab select Map network drive.
- It doesn’t matter what drive letter it suggests, it can be any letter to function correctly. Network drive letters usually start from the end of the alphabet and go backwards.
- To the right of the Folder field, click the Browse button.
- Expand your network view by clicking on the plus button next to its name. Find the name of the Server computer and click the plus next to that name. Left click the Church Windows share (usually the CW folder, unless it was renamed during the install) and click OK.
- Make sure there is a
 checkmark in the Reconnect at Logon box and click Finish.
 - Next, on each Workstation, follow the Church Windows Installation instructions except select Workstation from the install type options. This will install certain necessary files in the Windows\System folder and Common Files folder on each Workstation.
- At the end of the installation, you will see a screen that will create a shortcut if you need to make one. It will find your drives and you can select the mapped drive you created to the Server Church Windows install. For this example below, the mapped drive letter is Z:
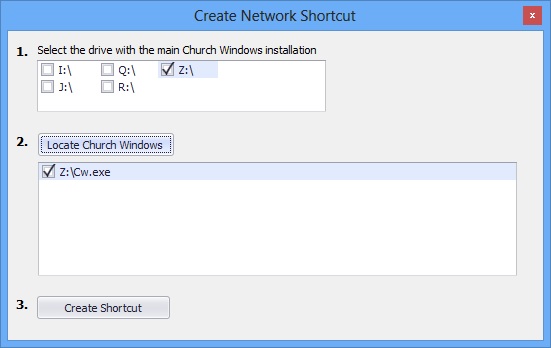
- Finally, clicking on Create Shortcut will put a new shortcut on your desktop for you.
Note:
The Workstations must have the exact same version installed as the Server. If service releases have been run on the Server, they will also need to be run on the Workstation.
